
 |
 |
| jig for cutting foam candy wraper ends | test cut of foam to see how this will work |
 |
 |
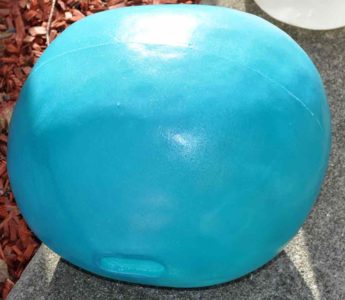
| glued up foam billet ready for initial cutting | Initial cut making a cylinder. the cylindar is later cut on the other axis to make a more ball shape. |
 |
 |
| rough shaped carved for the candy body. Note i have left a nice flat spot at the center of each side for later attaching the wraper ends | What a mess |
 |
 |
| Initial shap smothed with 80 grit sand paper in the palm sander. | Candy Wraper end with initial foam coat applied. This stuff is really hard and sanding this coating is realy hard. |
 |
 |
| After some more coating, sanding and extra paint to seal the part before mold making | I found that making the recess for mounting the candy wrapper ends in the foam and hard coating was becoming a pain so i made a quick part out of clay and made a urethane rtv mold to cast two plastic inserts for the candy body. This allowed for much nicer sockets on the candy body for molding |
 |
 |
| Candy body with some hard coat and sealing paint in the middle of the smoothing process | close up of the candy wrapper socket in the main body |
 |
 |
|
3/8 inch clay jacked applied to the mounted master. The raised ribs are an additional 3/8 thick and are used to thicken the edge and provide keys for aligning the inner urathane mold with the mother mold. For this one I am using alumnun shim to create a deviding wall instead of clay. The clay is heavy and would need additioanl support. Not shwn here is the fiberglassing process. I sprayed three coates of just tinted resin (could have used Gel Coat for this) letting it start to gel between coats. Then came back with a resin paste(mix of resin and glass balls and cab-o-sil) to fill the sharp angles into a transsisition that the glass cloth would bend over better. |
The original turned over in the stand. Here the clay jacket is on and sealed. The shim wall is removed here with the clay cleaned up making a nice edge at the transistion to the purple fiberglass. Note the alumnum tape around the outer edge of the fiberglass, this is to create a channel to help build up the flange of the mother mold. |
 |
 |
| Sitting on the floor for a few days waiting for resin to fully cure. | Pooring urathane into the cavity left by removing the clay from the first half of the mold. This gets repeated on the second half once the urathane fully cures. |
 |
 |
| Note the weep holes to better allow air to excape. These hold were plugged with clay once the urathane started coming out. | Second half of the mold. Note that there are two hold on this half. The lower one is where the urathane was poored in and the upper one is a hole through the urathane that will be used for pooring in the resin for rotocasting. |
 |
|
| Mold opened up with the master removed | |
 |
 |
| Clay deviding wall and jacket for the wrapper ends of the candy ready for fiberglassing the mother mold | |
 |
 |
| First half of fiberglassing completed, and ready for making the second half | mold opened after making second half of mother mold. From here the clay will be cleaned off this half and the inner urathane part of the mold can be poored. |
 |
 |
| mold closed up with urathane poored in. | Mold finished |
 |
 |
| smooth cast 325 with a high rotation rate. note the clear with lots of small air bubbles. The bubbles are not on the surface at all. | |
 |
 |
|
Parts drying from being washed to get the mold release off. Note the difference between slow rotation on the left vs faster rotation on the right in air bubble creation |
|
 |
 |
| Gluing the first end on the candy. Using a bucket here to hold the candy steady with the end straight up while the glue cures | Light socket assembly. This is an extended E-11 socket on a 4 inch pipe attached to some threaded steel bar drilled with mounting holes for screws |
 |
 |
|
Light socket assembly is mounted under one of the end wrappers with the cord coming out of a small notch cut into the wrapper edge. |
|
|
|
 |
|
to paint these I hung them on thin twin to I could paint everywhere at one time |
|
|
|
 |
